
UPDATE 4.2018: Given the interest in this drum carder, Spencer has posted a set of detailed plans in his Etsy store.
This is a guest post written by Spencer:
Spinners have some interesting gear. They come with their niddy noddies, they come with their lazy Kates, and if you pry it turns out they have various carders stashed away. And then, of course, there are the spinning wheels — and from what I can tell, no two spinning wheels are alike, which means that every spinner needs three or four.
After seeing the prices for some of this equipment, I decided to try my hand at making what I could. I’ve long known that builders need spinners, but this was my chance to prove that spinners need builders.
First I built a niddy noddy, and then a lazy Kate. They seemed to work well enough, so I thought I’d take a crack at a drum carder. Hand carders are nice, but when several fleeces are kicking around the house, a drum carder seems to be essential equipment that functions in the interest of moving things along. If we had a drum carder in the house, I found myself thinking, I might be able to see the kitchen table once in a while, and maybe even the floor. As it is, I only see raw wool.
The first thing I did was examine the drum carder Melissa had on loan from her spinning guild. It appeared to have quite a few miles on it, but the design seemed sound enough for the purposes of copying with some slight variations. Looking online, I found that most drum carders are constructed more or less along these lines. Here are a few pics of the model carder. You can see it had a metal tray, leather belt-drive, and a relatively low TPI for the carding cloth. These features were changed.


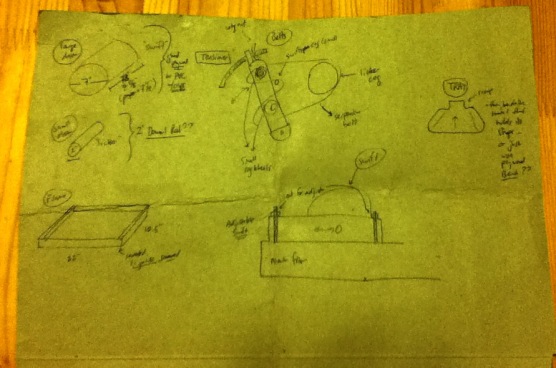
The next thing to do was to draw up some technical diagrams on the back of a cereal box. This took about five minutes and, unfortunately, the diagrams were always either forgotten or misplaced during the actual building of the carding machine. But the sketches were drafted nonetheless. Here are the technical diagrams:

With the plan in place, the next thing to do was to send out a cry for help to our friend Steve. Steve has extensive experience building one-off machines. He’s also no stranger to precision, and this was a time for exactly Steve’s kind of experience. Most of what follows is thanks to Steve.
Steps in Our Build:
I built the frame while Melissa ordered some carding cloth. She wanted the licker (small drum) to be 90 tpi and the swift (large drum) to be 120 tpi. This resulted from some research I did not understand followed by long paragraphs about micron count that I also did not understand. I nodded and agreed with the decisions about tpi, as that was a wool thing. I was just building the machine. By far the most expensive part of any DIY drum carder is going to be the carding cloth, so brace yourself for that cost: it aint cheap.
For our drums, Steve and I cut out two series of plywood discs using Steve’s CNC router. We could have used the bandsaw, but the CNC router makes perfect circles. Steve likes perfect circles. Here’s a pic of what we came up with, along with a video of the CNC router in action:

The circles were then punched out of the plywood sheets and glued together using the shafts to keep them straight. With the two drums (licker and swift) assembled, we got to work sizing the shafts, installing and fabricating various shaft collars, and fashioning a handle. This was done with left over materials from Steve’s shop, so not too many new purchases had to be made.
Here are a few pics of the drum carder in a nearly-assembled phase. This was taken after about 5-10 hours of work. At this point, we were just about to nail on the carding cloth and assemble the belt.


I should mention that we considered adding a motor to power the drum carder, but figured that, since it’s more of a prototype, we’d keep it simple and go with a hand crank. (Also, Steve only had about a dozen motors on hand, so we didn’t want to diminish his stock.) If we wanted to add a small low-RPM motor in the future, that would be an easy change.
Here are some final pics taken in the dim light of our wool den (formerly known as the kitchen). The serpentine drive worked out well, I think, as we haven’t had any slippage issues yet. Also, you’ll see that we went with a simple plywood tray for feeding the raw wool into licker, and that seems to be working well, too.


And, finally, here is a YouTube video about the anatomy of our DIY Drum Carder. Melissa had a recently washed fleece from a Corriedale sheep lying around, so we carded up a few batts and she was spinning it into yarn by midnight. Thanks again to our buddy Steve, who is the only reason this thing ended up 1) functional, 2) made from un-rusty parts, and 3) completed in 2015. Steve, you make great machines happen.
UPDATE 4.2018: You can download the plans for this drum carder here.

Pingback: DIY Lazy Kate | Knitting the Stash!
Pingback: Homespun Evolution | Knitting the Stash!
Pingback: Drum Carder Hack: Wallpaper Brush | Knitting the Stash!
Pingback: My Better Half OR The Man Behind the Carder | Knitting the Stash!
Pingback: Statuesque | Knitting the Stash!
Hi this might sound silly but I’m wondering, what is beneath the carding cloth on the big drum? Is it a large cylinder or is the cloth just nailed to the ends of the cylinder? I hope I’m describing properly what I’m asking. Thnx
LikeLike
Hi Sonya–I missed your comment! Sorry about that! Under the cloth is a drum made out of slices of plywood that have been glued together to form a tube. Hope that helps!
Melissa
LikeLike
Pingback: Finding a Forever Home: The Swap | Knitting the Stash!
Pingback: DIY Drum Carder Overview | Knitting the Stash!
good day, I am from Czech republic and I am trying to build this carder for hobby carding. Can I ask for dimensions of drums and gear wheels? Thank you for your answers and this page.
Best regards
Ing. Jiří Vašíček
LikeLike
Hello Ing. Jiří Vašíček,
Here are our dimensions. Good luck with your project!
Large drum: 7 inches diameter (17.75 cm), width is determined by the width of carding cloth that you are able to buy
Small Drum: 2 inches diameter (5 cm), width is determined by the width of carding cloth that you are able to buy
Note that the drive cogs are that same size: 7 inch cog on the small drum and 2 inch cog on the large drum.
WE’d love to see pictures of your project once you complete it!
Spencer
LikeLike
Hi Spencer,
I am currently building a carder for my sister after watching your video. The questions I have are:
1) wot is the distance between the feed board and the end of the tines in the cloth
2) should the tines on the to drums touch or more or should there be clearance between them?
If u could email me that wud be great
LikeLike
Hi Adrian, Email me at metaspencer@gmail.com for discussion of this … but note that I have plans at etsy.com/metaspencer … and no, the tines should not touch
LikeLike
I was worndering about how long did this take you to make? And how much did it cost to makenit in the end? Amazing tutorial btw and I’m excited to try!
LikeLike
Total time was probably around ten hours: that includes a couple hours for planning, then two sessions working on the actual carding machine. That’s kind of an estimate and I’m sure you could spend more or less time. As for cost, if you were to buy all the components, you’d probably spend around $200. That’s another estimate, as the only thing we bought was the carding cloth (which you can find online). All of the other components were things we had around the shop: some pine for the frame, some plywood for the drums, screws and glue, the shafts, shaft collars, and then the various other small components.
This project was a lot of fun and our drum carder is still going strong!
LikeLike
Pingback: Knitting Treadmill Workout | Knitting the Stash!
Reblogged this on fairylix and commented:
Hmm… I think this has a lot of potential.
LikeLiked by 1 person
If you cut this on cnc then I wonder if a Cad drawing was made and might be available?
LikeLike
I Will check my files …
LikeLike
Wow!!! This is fantastic and so appreciate the video of instructions to “dyi”!!
LikeLike
We’re glad you liked it! Our drum carder is still going strong! 🙂
LikeLike
This is the weekend I attempt to build a drum carder- I’m so thankful for your diy information!!! Now, let’s see what happens!
LikeLike
Good luck with it! And let us know if you have any questions as the build come together. Soon you’ll be carding like mad! 🙂
LikeLike
Pingback: Knitty Naughty | Knitting the Stash!
Awesome informative video, my eternal THANKS!
LikeLike
Are you gonna make one, Linn?
LikeLike
I asked my DH to make me one When I told him the price of a store bought one, he said he will make me ten for the price of that! 🙂 He is a mechanical engineer so he should be able to do it. Will definitely share a picture if he does get around to making it – which is another thing as he likes to stall things unless it is for himself!
Regards
Linn
LikeLike
I’m sure it will be great!
LikeLike
What is the length of the two cylinders? I’m turning them on the lathe and trying to figure out their dimensions. Also, great tutorial/instructions overall! Thanks!
LikeLike
The drums on our DIY drum carder are both exactly 9.25″ long. This was entirely determined by the width of our carding cloth. I’d suggest you measure your cloth before sizing your drums, just so the size is right.
It’s cool that you’re making your drums on the lathe! I had considered that and think it will make for a great machine.
LikeLike
Pingback: Episode 1: Overdue Introductions | Knitting the Stash!
I want to thank you for including the picture of the original drum carder you used as inspiration; I have this exact antique drum carder and the belt went missing during our recent move. The pic was exactly what I needed to order a new custom leather belt! Thanks! I hope you’re enjoying your DIY drum carder. How is it working for you, a year on?
LikeLike
Oh that’s great! Those leather belts are nice — ours stretched a bit at first, but the carder is great overall. Super useful!
LikeLike
OMG..I just won that exact model in your original photo and no belt. Would love to know the size of the belt and where to find one.
LikeLike
wow, that’s great! we made our belt out of round drive belt that you can buy at McMaster: https://www.mcmaster.com/#round-belts/=16wyip5 … if you use some string to measure how much belt you need, you’ll be able to determine how much you need. good luck with it!
LikeLike
Which type of the belts from McMaster did you use? I guess the degree of elasticity matters?
LikeLike
I believe the belts we got were the round belts, at 1/4″ in diameter … but I’m sorry, I don’t recall the exact belts
LikeLike
I purchased one just like this and would like to get it converted into an electric car do to my health issues. Do you have a way to do that or know anybody or anywhere that can make this happen?
LikeLike
I mean carder
LikeLike
You would simply need a small motor to run the carder. It could be converted with minimal work — what area are you in?
LikeLike
building a drum carder is on the top of my future projects list. I’ve seen the youtube video countless times. hopefully one day I’ll have enough time to start working on it 😊
LikeLike
Oh, you’ll get to it! Once you get started I think you’ll be surprised how easy it is … and it’s great to have once you’re done!
LikeLike
im not worried about the difficulty of the project. After doing a lots of research, i was surprised how simple the mechanics of the carder actually is. that’s why i decided to make one myself. the biggest problem I have is the time or the lack of (with a toddler and soon newborn running around the house)😊
LikeLike
That’s very familiar! First build machine to stop time. Then build drum carder. 🙂
LikeLike
Hello! I’m from Russia. Carder almost did, but the problem with corderoy tape. Please tell me where to buy? Would it be possible to order by mail?
LikeLike
Hello! I’m not sure what you mean when you say “corderoy tape” … if you’re talking about the carding cloth, yes: you can order it online. Just search for “carding cloth” … let us know if you need more help!
LikeLike
these guys have it: https://www.paradisefibers.com/collections/carding-cloth
LikeLike
Thanks, Yes I was talking about carding cloth.
LikeLike
Do you have the actual plans and instructions to make this?
LikeLike
We don’t have plans up yet, but are working on some. Thanks for the encouragement!
LikeLike
GENIAL!!!!!
LO PROBARÉ YA QUE ESTOY MUY INTERESADA EN CONSTRUIRLA. GRACIAS!!!!!!!!
LikeLike
De nada. Mucho suerte!
LikeLike
Hello!
I am planning to make my own drum carder.
And i was thinking of an alternative to make the drum because all those slices of wood is a bit too much for me. Do you think it is ppssible to use a Drum shell for the base? Because then i only have to cut out the 6 circles. They are available online in several sizes but im not sure if they are strong enough for the base…
Regards, Isabeau
LikeLike
I’ve heard from a few people who are thinking about using a drum of some kind. Here are my two thoughts: make sure you have a way to securely run a shaft or axle through the middle, so it will rotate smoothly. Also, make sure your drum is one you can attach your carding cloth to. I’m thinking glue might work for attaching the cloth, in your case.
Good luck with it!
LikeLike
Have been doing some research about blending boards which use carding cloth.
Time and again the advice given is DO NOT glue the cloth down, as it stops it working properly, it needs some flex in order to function. Hope this comment is not too late.
LikeLike
Pingback: Episode 25: Podversary Celebrations and Fiber Philosophies :) | Knitting the Stash!
Yeah, we tacked ours down and it works well
LikeLike
What I was looking for was how to do the staple the prickly on the drum I needed that info I have 5he rest just does not show the pricklys on how it got put together in order to be on drum show everything but that that wat I’m looking for:(
LikeLike